Saturday, May 18, 2013

My Sourdough Bread


Simple Sourdough Bread with a Low Knead Procedure
Makes two large loaves 
• 1 Cup Active Sourdough Culture   
• 2 Cups Water
• 5 to 6 Cups Flour (divided)
• 1 Tablespoon Salt
Make the sponge:                                                                                                                                                                                                  
Night before put one cup active starter into a bowl and add two cups of water and two cups of flour. Stir until reasonably smooth, cover and let set overnight. If the sponge looks active (bubbly) you're ready to go.
Make the dough:                                                                                                                                                               
Stir one tablespoon of salt into the sponge. Add three cups of flour to the sponge one cup at a time. Stir to incorporate after each addition. I always stop at this point and judge the dough. With experience, you will know exactly how much additional flour is required. Until you have enough experience, add flour 1/4 cup at a time until you have a soft but not real sticky dough. Use your hands for the last cup or so. Cover the dough and let it rest for 15 minutes or so, so the flour can absorb the water.
Knead the dough:                                                                                                                                                            
Knead the dough 15-20 times, let rest for a few minutes and knead again 15-20 times. Repeat once more. Place dough in a lightly oiled bowl, cover with plastic wrap and a towel, and let rise for one to two hours. It does not need to double, but it should definitely increase in volume by at least 50%. 
Stretch and fold: Very Important!!! DO NOT PUNCH DOWN! True sourdough does not get punched down like yeast bread. You want it to maintain its airy quality. Dump the dough gently onto a lightly oiled or floured work surface. Gently stretch the dough into a rough rectangle about one third as high as the dough was when dumped on the counter. Fold the dough into thirds like a letter, and then fold the dough in thirds in the other direction. Round the lump of dough and put back in the lightly oiled bowl, cover and let rise until fully doubled. (1-2 hours)
Shape the dough:                                                                                                                                              
Divide the dough into two equal pieces, round, cover, and let rest for a few minutes (5-15). Gently form the rounded dough into loaves to fit your bread pans. Place the dough into buttered bread pans, cover and set aside to rise for another hour or so. It should rise slightly above the pan but if it doesn't don't sweat it. It still tastes great!
Bake the bread:                                                                                                                                              
Bake at 375 degrees for about 40 minutes. Remove from pans and brush with butter.
Notes:                                                                                                                                                                        
Turn this into a nice whole wheat bread by substituting 1 1⁄2 cups of whole wheat flour for an equal amount of white flour and add one tablespoon of honey and two tablespoons of molasses, or some combination like that.
The thing I love about sourdough is that it doesn't mold like yeast breads. Even after it has gone quite stale it still makes great toast, and I dry in the oven whatever pieces are left and save them to crunch up for breadcrumbs. 

Wednesday, May 8, 2013

Beef Bone Broth, Part 2

Okay, so it's the next day now. Last night I removed some meat off the bones before placing the whole mess in the crock pot to simmer over night. It's not a huge amount of meat, but enough for a nice pot of beef barley someday.

Before going to bed I put the crockpot on it's lowest setting and added a good dash, maybe 1/4 cup of apple cider vinegar to the broth. The acidity of the vinegar helps to leach all the good minerals out of the bones.


In the morning I pulled all the bones out of the broth with tongs. As you can see some of the bones are cleared right out, the marrow releasing itself into the broth. Other bones need some help. I use various methods to accomplish that. With poultry I use a nut cracker or seafood cracker thing. You can also simply loosen with a knife by sticking it into the ends of the bones and twisting it around a bit. I have also been known to take a hammer to some of them! I want that marrow!!! With that said, don't obsess over every little bit of it. Some of it can be pretty hard and resistant. Just get what you can. Once that is done slide the whole mess back into the pot.


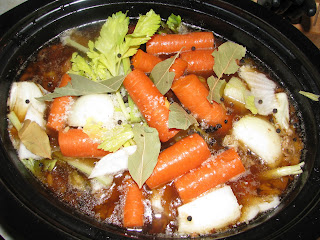
Now it's time to add the vegetables that flavor your stocks and make them yummy good. I use carrot, onion and celery. This picture doesn't look like a lot but it was actually quite a bit; 2 onions, quartered, several stalks of celery with leaves, and 5 carrots, chunked. I use a bit more carrot in beef broth than I do in chicken because the carrot will help to "sweeten" the broth, meaning not a sugared sweetness, but that good balance between "savory" and "sweet". Don't be concerned with perfect cleaning and chopping. All the onions need is the outer skin removed, and the carrots and celery are both organic so just got a rinsing and then the ends cut off.


The only spices I use in broth making are a decent salt, a small handful of pepper corns, and several bay leaves. I spent years making broths trying all kinds of combinations of herbs and spices, only to learn that they don't always end up tasting good. Bay holds up to the long cooking times and gives great flavor, but other spices taste bad after being cooked for so long, so I add those to the foods I'm making with the broth, rather than into the broth itself.


Here's the broth on it's last stage ready to simmer for a few more hours. And below is the finished product ready to strain. Put the pot of strained broth in the frig overnight to cool. Then you can defat if you want the next day. At that point the broth is ready to use or package into freezer containers for future use.

So, there you go...beef bone broth. A little time consuming but well worth the effort.


Tuesday, May 7, 2013

Beef Bone Broth, Part 1

I remember as a little girl begging "Mama" for a bone from the broth she was making so I could suck the marrow out of it. Probably my mom was not even aware of all the life giving nutrition in that kind of broth. She was simply following the dictates of what her farm-women ancestors had done before her. All I know is my little farm girl body must have recognized a biological need for that nutrition.

Good beef broth is a bit trickier to make than chicken broth. It's not so much that its harder, just more problematic for a couple of reasons:

1. It's harder to get a hold of good marrow bones. Chicken is fairly easy. You just use your chicken carcass. But beef bones are scarce. Most stores don't offer them anymore even if you were willing to make marrow broth from big industry cattle...which I'm not! I find it's easiest to collect beef bones over a period of time. When I get meat from our grass fed guy I pick up a couple of soup/marrow bones, or some soup shanks and stick them in the freezer. I also save any bones from cooking, sometimes including a few ham or ham hock bones as well. When I have a decent supply built up it will be beef broth making time.

2. The other reason beef broth is trickier is flavor. Chicken broth seems to taste good no matter how you make it. But beef broth requires some different techniques to get a good meaty flavor. Oh, your broth will still be healthy by just throwing everything in a pot of water, but it will lack a wonderful toasty meaty "beefy" flavor.

So here's how I do it. When I have like a cake pan full of bones I arrange them in the pan, salt and pepper them, drizzle them with an acceptable fat like lard, bacon fat, coconut oil, whatever. Place them in a 425 degree oven and then watch them fairly closely while you're working in the kitchen. After about 15 minutes or so they should be sizzling and you can turn them over. Allow them to sizzle awhile more watching them closely. The photo below shows what you're aiming for; sizzling, toasty, browned, great smelling, but not burnt!


Take all those pieces out of the pan and transfer them to a pot. Next you want to add a cup or so of water to the pan and scrape up all that great crusty tasty stuff from the pan. There is a lot of flavor in there that you don't want wasted. Don't worry about defatting. That will come later if you wish. Pour that into the pot as well.


Now fill the pot with whatever else you have to go in there. I had a few bits of ham hock meat and a bit of beef from a leftover roast that I had stuck in the freezer at an earlier time. You know, all those quirky bits that nobody can actually chew or eat? Don't toss them! Stick them in you soup-making freezer bag. They will add a lot to your broth later.

Fill the pot with enough water to completely cover. The amount of beef material shown in my pan is enough for a nice full pot of broth.


I am not putting any vinegar in at this point. Since my bones have quite a bit of meat on them I'm going to let this cook for a few hours and then remove that meat before continuing on with the bones. Which brings me to another issue that people often ask about. When making a long-cooked broth like this when do you add the savories...the veggies? Here's what I have found through many years of making broth. When I add the veggies, particularly carrot, to the broth early and let it slow cook for 24-48 hours with the bones, the broth takes on an over-cooked carrot taste that is very unpleasant. Bones are meant to be long cooked; veggies are not. Even with meat, I don't leave that in long term because I don't think the broth tastes as well when it's done.

In a few hours I will pull off the meat and freeze it for soup later. If you don't have any meat on your bones that you want to salvage you can just go right on with the next phase.

At this point the broth and bones will go into the crockpot, with a good dash of apple cider vinegar to aid in leaching all the good minerals out of them, and then you can leave that to slowly cook over night.

Tune in tomorrow as I move through removing of the marrow, the flavoring of the broth, and the final steps of adding the savories and herbs to season the broth and finish it off.